Use of Hardibacker Screw in installing Floor Tiles
Planning to restore your kitchen floor tiles or mend a damaged piece, but worried of the expenses? Well, you need not have to rely upon the expensive tradesman, who can unnecessarily exceed your budget line. You can volunteer for this job and all you need is to have a clear knowledge about the processes involved.
After understanding the method involved, you’ll now have to accumulate all the required ingredients, such as the hardibacker board, hardibacker screws, trowel, mixer and accurate drill and so on.
The hardibacker board is the brainchild of James Hardie Company and comprises of 90% of Portland cement and sand. Such types of floor tiles are fabricate resistant and are ideal for water-logged or wet areas. These days, these tiles are in much demand and most of the new constructions are seen installing these boards in the kitchen, bathroom as well as in utility areas.

Always remember that such kind of flooring supply is not any structural element, so if your kitchen’s floor molds due to improper joists then restoring task won’t help you much until and unless you fix the underlying architectural issues. Such tiles only enable a solution to bridge the existing gap between the plywood and floor tiles. And also keep in mind that you’ll need hardibacker screws to install those concrete pieces.
Here are some of the basic steps to look after
Step 1
The installing procedure will include grinding and levelling concrete floors to screwing a wooden subfloor with the above mentioned fasteners. However, you’ll always require a dry, reasonably flat surface for this job.
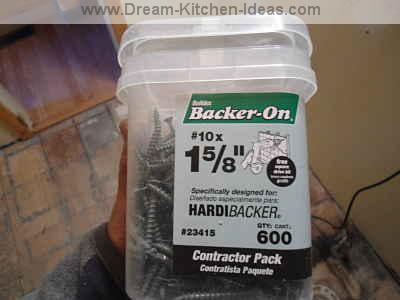
Now you’ll have to go for 1/4th inches of backer board and you certainly require special kind of screws, known as the hardibacker screws. These are slightly different than the usual screws. Plus, their threads are specifically designed to pull down the head of the screws for proper positioning. We highly suggest you not to go for drywall screws.
Step 2
Now we should go for the subway pattern, which is quite a popular technique followed in flooring. It is usually an offset pattern. You should always remember to ignore any excess amount of pieces. Measure both ends and draw a line, which helps you in laying the tiles in straight rows.
Step 3
Now mix up the pudding texture by using a mixer in your drill and with the flat edge of your trowel, you can start spreading the mixture in thin layer called as scratch coat next to the straight frame. Now before the coat dried up, apply some more thinset in rows. By applying the paste in rows, you can allow the air to escape as you set the tiles.
Step 4
This step is known as grouting. By now you would have left the tiles overnight for setting. You can now use a cleaning tool to remove the extra thinset from the surface and also from the joints. Now mix up a portion of sand grout by adding bit water so as to avoid the paste to become thin. Now spread the grout onto the floor, by using a margin towel scoop and rubber float held at 45 degree angle.
Required Supplies
Thinset mortar
Ceramic floor tile
Tile Grout
Hardibacker screws
Mixing paddle
Foam sponges
Tile cutter
Tape measure
Nippers
Trowel
Rubber float
Leave a Reply