Category: Uncategorized

All You Wanted to Know About Finish Nuts

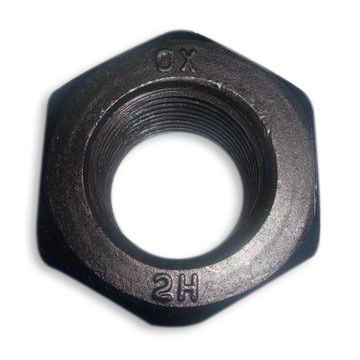
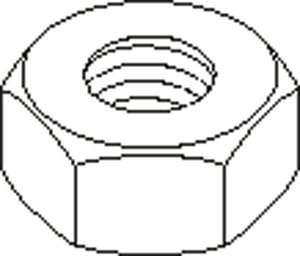
Finish nuts are usually hexagonal nuts, having six sides, as this kind of shape is the easiest to grasp. These nuts are small threaded metallic blocks and mainly help in securing bolts. These nuts along-with bolts fasten machine parts for assembly in step by step fashion.

These are also known as “hex nuts” because of their hexagonal-shaped heads.

Specifications

The hex finished nuts are available in ASTM A563-A grade and are compatible with low carbon steel bolts, including SAE grade 2, ASTM A307, ASTM F1554 grade 36 and AASHTO M183. Besides, these rivets are also available in SAE grade 5 and grade 8 nuts in a finished pattern.

Dimensions of Hex finish nut

The sides of these nuts help in easily attaching to pliers and wrenches, so as to grip the nut and apply the required torque to it. Some of these metal pieces are hot-dip galvanized and thus add 2.2 to 5 mils of thickness to the threaded portion of a fastener.

The galvanized finished nuts are tapped flabby to adjust with the corrosion-resistant coating characteristic on the bolts.

Dimensions of Galvanized finished nuts

History

The Besson factory was the first to manufacture these nuts in 1568. In those days, these nuts were mostly used to festoon sleighs and carriages. Later in 1770, handmade wing nuts were created in North America for the same purpose.

Besson Factory

In the year 1818, Micah Rugg of Southington Township, Connecticut, designed the first nut and bolt manufacturing machine in North America, thereby paving the path for broader production of these fasteners.

Popularity

Although the nuts and bolts industry witnessed better advancements, but the use of these finish nuts are still in extensive use. No other nut can beats its usability and sheer versatility.

Materials

The hex finish nuts are usually made from steel, which has been specially designed with the help of a steel cutting machine. The entire manufacturing process is relatively fast, and thousands of nuts can be produced within a matter of minutes.

These days, nuts are available in steel, stainless steel, grade 5 black oxide, aluminum alloy, grade 2 zinc plated, grade 5 zinc yellow, brass, nylon patch, L9 Cad yellow, metric hex, silicon bronze, MS51971 Hex Nuts (Coarse Thread), MS51971 Hex Nuts (Coarse Thread) etc.

However, steel hexagonal nuts are used more than any other frequently used type.

Models and Sizes of Steel Hexagonal Nuts

The hex finished nuts are generally coated with a rust-proof material, so to prevent it from rusting. Nuts, which are rust-proofed, can be used for both indoor and outdoor purposes.

Types

#Grade 2

Grade 2 Finish Nut

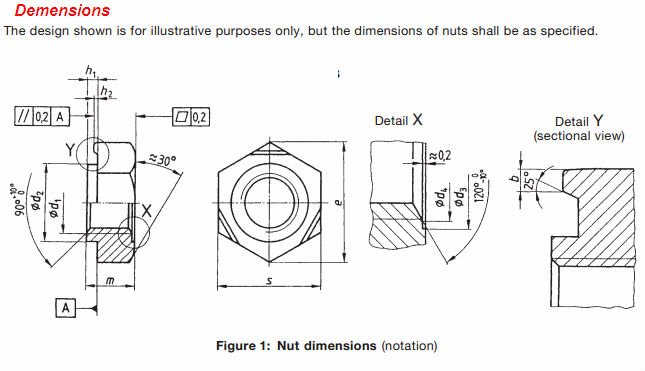
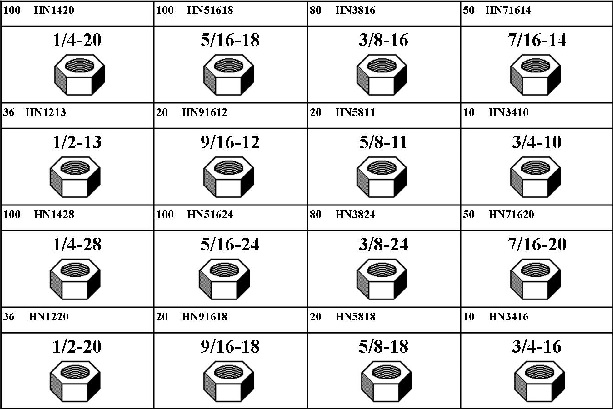
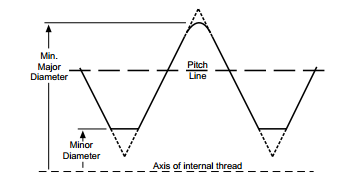
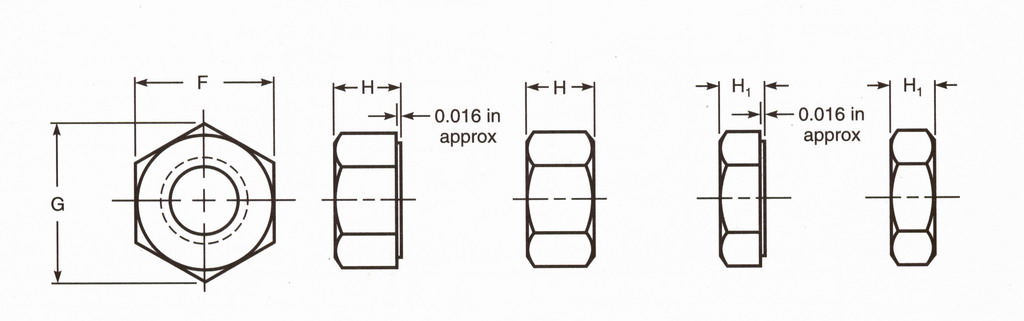
The Grade 2 type finish nut is a hexagonal shaped threaded fastener, with thickness of 0.875 D, where D is the normal nut size and a width of 1.5 D across the flats. These rivets are usually made up of low carbon steel. This is the most versatile and widely used design in the nut industry and can be used with any low carbon bolt, which is not heat-treated. The bolts should have a minimum tensile strength of 74,000 psi or less.

Diameter Graph of Grade 2 type finish Nut

Their composition includes the following:

  • Carbon: 0.47%
  • Phosphorus: 0.12%
  • Sulphur: 0.23%
  • Coarse thread: 90,000 psi
  • Fine thread: 80,000 psi

#Steel Hot-Dip Galvanized

Steel Hot Dip Galvanized finish nut

This kind of finished nut is also a 6-sided internally threaded fastener, with a thickness of 0.875 D, where D is the normal nut size and a width of 1.5 D across the flats. These are also made from low-carbon steel, featuring a  galvanic zinc coating.

These are used with low carbon bolts and screws, by applying a minimum tensile strength of 74,000 psi or less, so as prevent the fastener from moisture, salt and other such corrosive conditions.

Dimensions of Hot Dip Galvanized finish nuts

Their composition includes the following:

  • Carbon: 0.47%
  • Phosphorus: 0.12%
  • Sulphur: 0.23%
  • Rockwell B68 – C32
  • Coarse thread: 68,000 psi
  • Fine thread: 60,000 psi

#Stainless Steel, 18-8 & 316

Stainless Steel 18-8 & 316 finish nut

Such types of six-sided threaded fastener are hexagonal in shape, with thickness of 0.875 D, where D is the normal nut size and a width of 1.5 D across the flats and are made from austenitic alloys.

These rivets are used with stainless steel bolts and screws, by using a specified minimum tensile strength, which is either equal to or less than the specified stress of the mating nut.

Detailed Specification Chart of finished Hex nuts

Both types of stainless nuts are corrosion resistant, as they are made up of 316 stainless steel. Thus, they have greater resistance power as well as superior strength at raised temperatures.

Dimensions of all types of finished nuts

The composition of 18-8 stainless steel finish nuts include the following:

  • Austenitic alloys of 303, 303Se, 304, XM7
  • Chromium: 18%
  • Nickel: 8-10%
  • Rockwell B95 – C32

How to Wall Mount a Flat Panel TV

Mounting a flat panel TV to the wall not only enhances the overall look of the room, but it also removes clutter and frees the floor, thereby giving you additional space for other things. These days, such advanced television sets are in trend, so it becomes highly necessary for the users to understand the technique behind installing it. Although the manufacturer would enable you with technicians for mounting it to the wall, but those below mentioned tips will be indeed helpful, when you’ll be shifting. Continue reading!

Wall mounting a flat pannel TV

You will require the following tools and doodads to wall mount a flat screen TV

Tools required to wall Mount a TV screen

  1. TV wall mount kit
  2. Wall mount screws
  3. Power drill and bits
  4. Screwdriver
  5. Level
  6. Stud finder
  7. Tape Measure
  8. Socket wrench
  9. Pencil
  10. Cable-wire tester/locator

A standard wall mount kit features two mounting arm, which are supposed to attach to the back of your TV, wall mount screws and a broad bracket plate, which fixes to the wall. In this plate, the mounting arms are supposed to be locked, which helps in securing the TV to the wall.

Although a wall mount kit comes along with the set, but you’ll have to purchase certain other items such as drill bits, screw driver, socket wrench and wall mount screws for installation. The online stores are the best media to grab those supplies at the best buys. You can visit here to look for those items at affordable rates.

wall mounting the TV

You can do it yourself, provided you follow the steps and have got required supplies. As you work on your project, make sure to go through the manufacturer‘s instructions manual to make your task more easier.

Preparation


A man installing the flat screen

  • Before initiating the task,  go through the manufacturer’s mounting instructions for both the TV and the wall mount screws
  • Now make sure you have got all necessary hardware and cable for the installation
  • Now decide, whether you want to show or hide the cables in the wall behind your TV
  • You will however need the help of another person to help you hang the TV on the wall bracket

Now follow these basic steps

#Step 1 

Attaching the mounting bracket to the TV

Attaching the Mounting Bracket to the TV

  • If the TV frame already features a stand then you’ll have to unbolt and remove it
  • Now look for the mounting holes on the back of the device. You may also have to butt in the plastic caps over the holes with the help of a screwdriver
  • Fix the mounting arms to the mounting holes with the help of the wall mount screws and bolts, which you have purchased online
  • However, make sure neither to over tighten it nor use a power drill. Just try leveling the two mounting brackets with each other
  • Now place the TV in accurate position, so that the screen is facing upward, as placing the device with the screen facing downward can damage it permanently

#Step 2

Determining the best wall location

Choosing the best wall location

  • You’ll have to identify the best wall location for mounting the TV
  • Select a location, which is free of glare and renders good visibility from all sitting areas in the room
  • To have maximum viewing comfort, you can mount your flat panel TV at a specific height on the wall, corresponding to the viewer’s eye level from the sitting area. The center of the screen should be located at least 40–45 inches from the floor
  • Make sure that your chosen location is close to an electrical outlet
  • Measure the length of power cod, to make sure it reaches to the plug point

Here’s a video, which can help you in wall mounting your TV. Have a look!

#Step 3

Installing the wall mount bracket to the wall

Installing the wall mount bracket on the wall

  • You’ll require a stud finder to trace out the two studs in your wall, to which the TV would be fixed
  • Now spot the location of each stud’s center with a pencil. You can use a screw to confirm that stud has been located
  • Now measure the distance between the top and bottom holes on each of the mounting arms. The two points in the center of each wall stud should also be marked, corresponding to these holes. It’s suggested to use a level, so as to ensure that the mounting holes for each arm are even
  • Now use a power drill to create pilot holes for the wall mount screws and bolts
  • It’s time to fix the wall bracket plate to the wall using these fasteners. If the kit already has lag bolts then you’ll require a socket wrench to drive them in

Note: Do not use hollow-wall anchors as they are not meant to support TV wall mounts.

#Step 4

Connecting the cables

Connecting the cables

  • Make sure the TV and the attached supplies are unplugged
  • You’ll require somebody’s help as said earlier to hold the device up to the wall mount. Now with your partner’s help, attach the audio and video cables to the television as per the manual instructions

History of Hinges

The history of strap hinges dates back to the antiquity so far that archeologists are not sure about its exact origin. While some historians claim these pieces to be 4000 years old, others deny the fact as they believe them to be even more ancient. In most of the European chapels in cities like Rome, Barcelona and Prague, beautiful strap hinges can be seen on the doors of citadels and chateau dating back to Renaissance and medieval era.


The strap hinges are believed to be developed by the Romans for both domestic as well as commercial purpose. Because these were designed in highly decorative designs something like Fleur de Lis styles, these pieces were considered for upscale lifestyle and also for sacred destinations.

Some of the recently discovered hinges are believed to be designed some 5500 years ago. These are believed to be in existence prior to the Bronze Age.


Hinges dating back to ancient era 

Some of the most primitive societies of Asia, Africa, Europe etc. give a hint of the existence of these pieces. They would have probably taken roots in the Bronze Age, as the colossal palaces and mammoth gates of Akkadian and Hittite panache were enabled with the bronze strap hinges.

During this era, the metal was a recent discovery and metal hinges were thus quite expensive. The emperors chose metal hinges for their forts, so as to showcase their power and wealth, while it was a dream for the common man to acquire one such item for his doors.

This was one of the major reasons, the iron hinges were mostly seen in chapels and fortifications as only the affluent people could afford such expensive decorative pieces.

The gate hinges were considered nothing less than any exclusive piece of jewelry, but with the gradual progress in metallurgy, various forms of alloys were invented like brass and steel, leading to affordable pivots in the market.


Middle Ages 

Metal greatly evolved during this period, thereby increasing the production of such hardware pieces. In this age, people were seen using hinged doors as local blacksmiths were now able to easily create wrought iron hinges. This time, the focus was only made on designs; the more beautiful a design was, the more costlier it was.

This is the reason, we can still see some impressive ornamental hinges in historical landmarks such as Gran Via de les Corts Catalanes, Carrer Minerva, Carrer Minerva and Ronda Universitat of Barcelona (below image)


The ornamental wrought iron hinges enhance the look of these massive oak doors, giving a royal and aesthetical look.

The classic drawbridge is one of the best examples. Such kind of passage had two important features:  it was strong enough to withstand heavy loads when lowered and was durable enough to resist breach attempts by external forces. Those features demanded the use of tough barge and sturdy wrought iron hinges.


These doors were also designed to occupy hinged weapons, so as to tackle any foreign invasions. The Persians were the first to develop a type of hinged trebuchet, which was regarded as one of the most deadliest hinged weapons in those days.

Victorian Era 

This is the most loved of all the periods which witnessed the evolution of strap hinges. When industrialization and steam engine were in full swing, the metal hinges also carved its way into  beautification. In this era, design and style were given much emphasis.

Home renovators, who are extremely fond of vintage items, prefer Victorian pieces because of their elegant design and superb finish. The 19th century witnessed the major success of these metal pieces as various innovations were launched, including hinges with ball bearings for smoother opening, and hinges with neat finishes. Although these pieces had successfully entered the daily life, but their evolution was far from over.

21st century  

Today, the strap hinges are highly evolved to render optimum usability and beauty. These items now feature corrosion resistance characteristic, which can efficiently protect these pieces from salty atmosphere.


And with the advent of online marketing, people can now easily access their desirable items from anywhere and anytime.