Sammy Ceiling Screws and their Installation Procedure
The Sammy ceiling screws have been quite a buzz these days. These particular fasteners have become a favored option for most of the builders these days.
So what is a sammy ceiling screw?
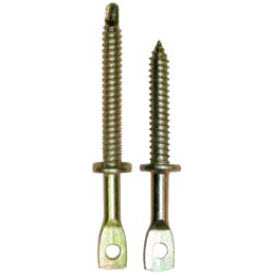
It is basically a kind of fastener enabled with a rod coupler attached to it, thereby making it a one-piece threaded rod hanger. This threaded hanger is available in varied configurations in the market to match with various industry requirements.
In order to install such screws, you’ll require a cordless drill and a Sammy screw driver. Although the standard driver is used in most cases, but if the fastener is a sammy screw junior or a side-winder then you’ll require a specially designed sammy driver.
And if you’re using this rivet for concrete then you’ll have to create a pre-drilled hole in the concrete by a hammer drill bit. You should for a Lagmater Plus extension pole, if the application is carried out on wood or steel from the floor. And if your task requires a Sammy Express anchor then you’ll require Sammy XPIT install tool.
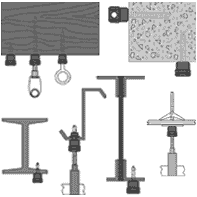
If your job requires you to hang the threaded rod from a joist or wooden beam then the Sammy Screw GST series is an ideal choice. These metal pieces are available in a variety of lengths and features various types of tips and you can choose a design depending upon the thickness of the metal on which you’ll be fastening the screws.
Moreover, such screws are basically lag bolts with threaded rod hanger/coupler and are available in various sizes to match with any kind of drywall which you may have to go through.
The sammy ceiling screw CST threaded hanger features a huge self drilling screw enabled with the hanger. And if you’re looking to fasten it to concrete then such kind of fastener is a suitable option, but anyhow you’ll be required to do the pre-drilling task.
One of the most preferred kind is the Sammy Express anchor.
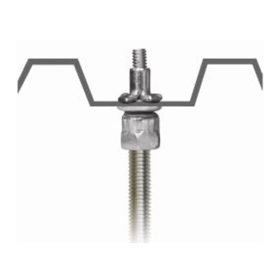
The Sammy X-Press® System is specially designed to enable direct attachment of threaded rod in metal deck of 22-16 gage, while ensuring less installation expense in terms of time and materials. The X-Press System flaunts an easy-to-install anchor featuring expandable anchoring strips which breakdown to prevent pullout after installation. Besides, it also assures a perfect installation, thereby offering the added benefit of one-tool efficiency (just drill and drive) in seconds!
Most of the above mentioned sammy ceiling screws are designed to accommodate 1/4″ to 1/2″ threaded rod and all these pattens are available in a side winder type as well. Such fasteners enable the user to mount the rod in a perpendicular direction over the anchor.

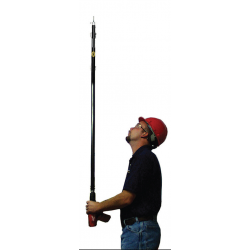
Installing Sammy Ceiling Screws with the Lagmaster Plus
The Lagmaster Plus tool is a recommenced device for installing the sammy screws into the wood and steel for the floor. This tool is usually an extension pole which goes into the end of the cordless drill. All one needs is to penetrate the threaded rod hanger into the center of the Lagmaster Plus and drill it into the ceiling.
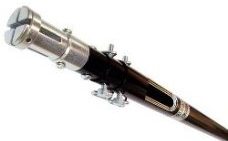
This tool usually consists of two poles: inner pole and outer pole. These poles are attached by a hitch pin thereby enabling the two sections to extend from 6 inches till 12 inches. You’ll find a hex shank on one end to chuck into the cordless drill and the other end features a receptacle to occupy the threaded rod hanger.
Before going forward with the installation process, first of all make sure you’re using the appropriate screw. If your task involves wood then check-out if there is a layer of drywall and you’ll have to consider the thickness of the fastener accordingly. In case of metal, you need to be extra careful, as most of the self drilling screws are designed for thin gage metal, while others are fashioned for heavy-duty metal.

After choosing the suitable fastener, cut the threaded rod to the required length and fasten it onto the threaded rod hanger screw. You can use wrench and channel locks to snug the threaded rod, which can then slide down center of the lag pole so as to fix the hanger into the driver.
Now carefully raise the device to the work surface without damaging the ceiling grid or ramming the tool into any lights.
By now, you have your threaded rod exposed and ready to hang your pipe hanger or anything you’re required to suspend.
Check this video for a clear understanding of the above defined process. Have a look!